Deploy your rooftop sprinkler with confidence
Use this visual guide to prepare, deploy, test, remove and store your Water Winger. Read the safety notes first, watch the short video, then follow the numbered steps in order.
- Clear both sides of people, vehicles and road traffic.
- Stay well away from overhead power lines.
- Do not deploy in high wind or toward unstable or loose roofing.
- If the roof path is not clear, move to another safe ground position.
Follow every evacuation order. Never delay leaving to deploy or retrieve equipment.
Two-page field reference
Water Winger Quick-Read Guide
A clear two-page reference covering setup, deployment, retrieval, troubleshooting and storage. Open it for quick guidance whenever you need it. A printed copy is included with every Water Winger shipment.
1. Watch the deployment video
The video shows the full motion before you begin. Watch once from start to finish, then keep this page open while you work through the steps.
- Confirm the sprinkler frame opens freely, the hose connection is tight, the throwing line is flaked without knots, and the deployment path is clear.
- Clear the roof path: Make sure nothing on the roof can snag or tangle the line. If an obstacle is in the intended pull path, pull the line back and throw it again slightly to one side so the line clears the obstruction.
2. Prepare everything on the ground
A careful ground setup prevents most snags and makes deployment faster.
Choose the roof path
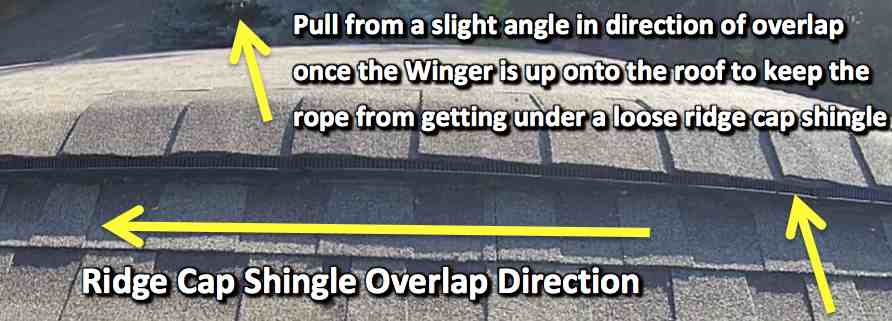
Identify the roof edge and peak. Pull with the ridge-cap overlap where possible so the line does not catch underneath shingles.
Open and inspect
Open the Water Winger fully. Check the skis, sprinkler rotation, hose gasket, rope clips and all connections.
Lay out the line
Flake the throwing line in loose rows. Do not coil it. Remove knots, tangles and twists before throwing.
Connect and route hose
Connect the supply hose and route it away from sharp edges, vehicle traffic and tight bends. Keep couplings supported.
Set a safe work area
Keep bystanders clear of both sides of the building. Plan where the weighted ball and line will land.
Know the tie-off point
Choose a strong ground-level anchor before lifting. The control rope must remain secure after the Winger is centred.
Important setup images
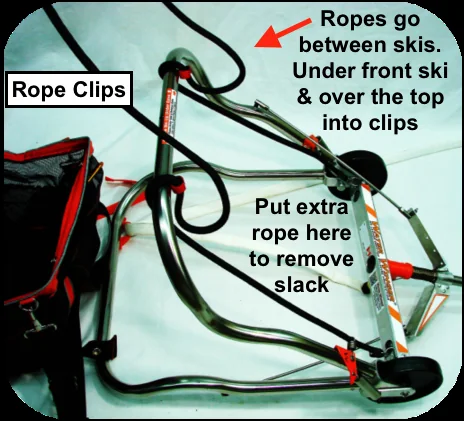
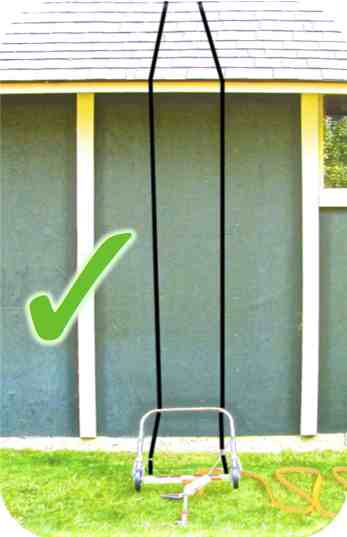
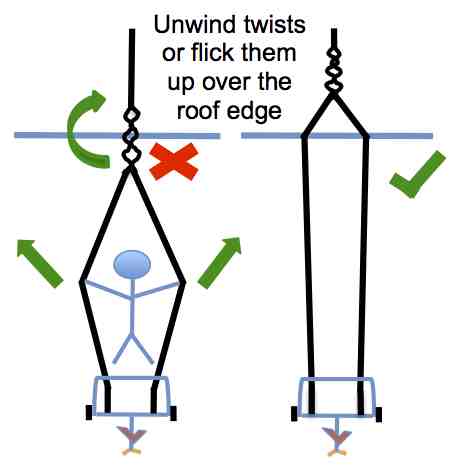
Pay special attention to these images. They show critical setup details that can be easy to miss in the video, including rope-clip placement, untwisted lines and the correct roof-ridge approach. Open any image to see the full-size reference.
3. Deploy in eight simple steps
Flake the line
Lay it in loose rows with the throwing end on top so it can leave the ground freely.
Send the weighted ball over
Stand clear and throw over the chosen roof path. Confirm the landing area is clear first.
Pull the light line through
Pull smoothly and keep moving.From the landing side, pull the light line until the heavier deployment rope is over the roof. A steady, continuous pull helps prevent snags.
Remove all twists
Pause before lifting the frame.Straighten both rope sections and confirm they feed freely with no twists.
Set ropes in the clips
Put both ropes between the skis.Press them into the rope clips exactly as shown in the setup image.
Pull over the roof edge
Stand well back so you can see the roof peak.Pull with steady tension—never jerk. Stop immediately if the line, hose or frame catches.
Centre on the peak
Continue slowly until the frame settles evenly with the sprinkler upright near the roof peak.
Tie off and inspect
Secure the control rope to the planned anchor. Check that hose and rope cannot slide into hazards.
4. Connect water and test the spray
Open water slowly
Pressurize the hose gradually while watching couplings, fittings and the sprinkler.
Confirm rotation
Make sure the sprinkler turns freely and produces an even spray pattern. Shut down before clearing debris.
Check the wet zone
Confirm water reaches the intended roof and surrounding areas. Adjust system pressure or nozzle selection only within the equipment plan.
Controlled removal
5. Remove the Water Winger safely
Shut off the water first, keep control from both sides and lower the frame carefully from the ground.
- Turn off the water, disconnect at the source and allow the hose to drain.
- Untie the control line only when you are ready to manage the frame from both sides.
- Pull gently from the hose side while controlling the opposite rope.
- Guide the frame to the roof edge and lower it with the rope—never drop it.
- If anything snags, stop pulling, reduce tension and change the pulling angle.
6. Dry, inspect and store
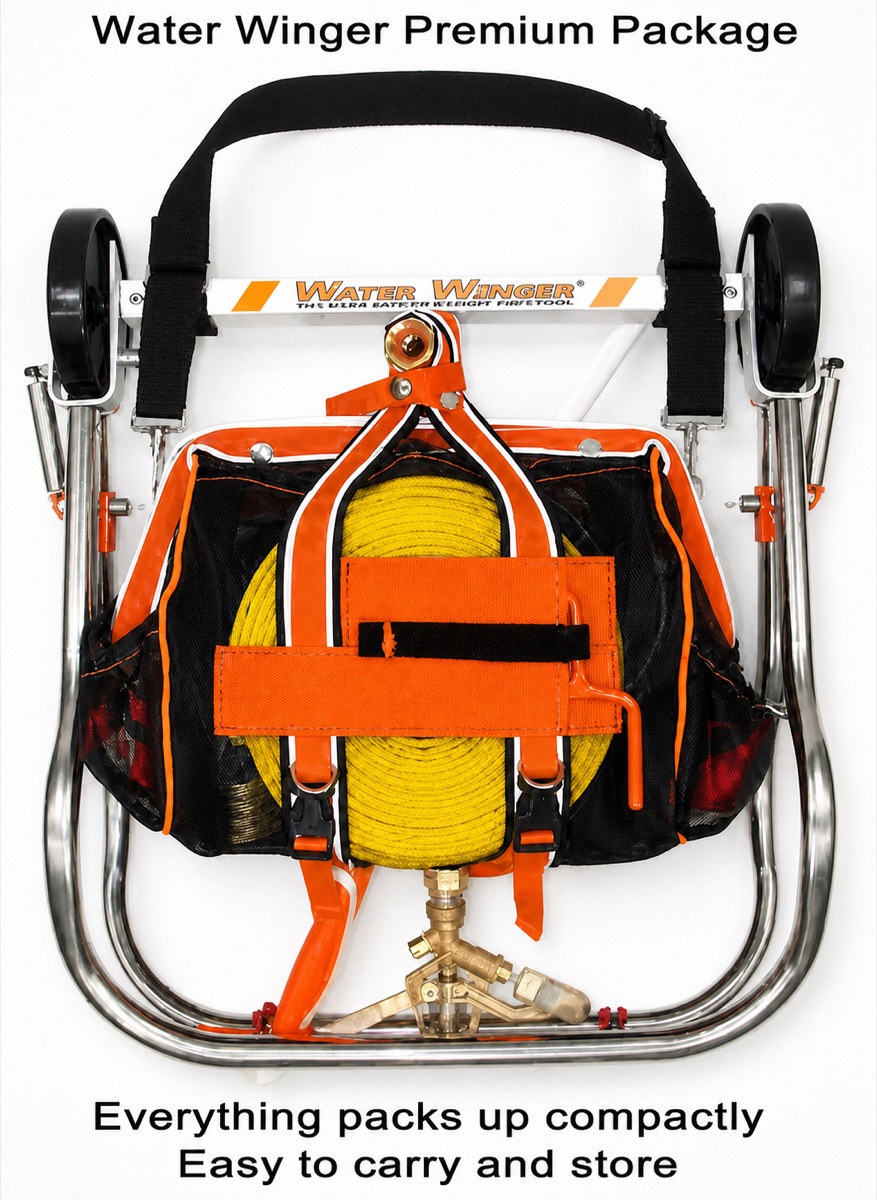
Keep the sprinkler, ball chucker, ropes, adapters, plug and fittings together for fast deployment.
Everything must be completely dry
Drain and dry the hose, sprinkler, ropes and mesh bag before packing them into plastic totes. Do not store the system in a damp location.
Inspect before storage
Flush debris, check gaskets, confirm the sprinkler turns freely, and inspect hose and rope for damage. Replace damaged parts before the next wildfire event.
Complete printable reference
Download the Full Instruction Cards
Keep these two-page field guides with your Water Winger. They include the complete illustrated deployment, removal and packing instructions.
Tip: Download or print both cards before wildfire season so they are available if internet service is disrupted.
Quick problem solving
Troubleshooting
Find the problem, stop safely and follow the three short actions. Never force a line, hose or sprinkler frame.
Line or frame snags
- Stop.Reduce tension immediately—never jerk the line.
- Release.Go to the opposite side and pull gently from the hose side.
- Reset.If the frame catches at the roof edge, lower it to the ground. Put both ropes under the front ski and between the skis, clip them in, remove twists and try again.
Sprinkler will not rotate
- Shut off.Turn off the water before approaching the equipment.
- Clear.Retrieve it from the ground and remove sticks or nozzle debris.
- Test.Confirm free movement, adequate pressure and enough flow before redeploying.
Weak or uneven spray
- Open the path.Straighten hose kinks and fully open every valve.
- Clean.Check filters and nozzles for debris.
- Flow-test.If output remains weak, use a larger hose or a lower-flow nozzle.
Throw line misses—or lands in the wrong place
- Keep clear.Keep both sides of the building and the landing area clear.
- If it misses.Retrieve the ball, re-flake the line and throw again from the ground.
- If it lands wrong.Remove the ball, close the clip and pull the empty line back quickly and smoothly so it sails over the roof. Re-flake and throw again. Never climb onto the roof during an emergency.
After deployment
- Drain.Empty water from the sprinkler, hose and fittings.
- Dry completely.Hose and ropes must be fully dry before packing.
- Store dry.Use clean plastic totes in a dry location—never a damp storage area.
If equipment catches, pressure drops suddenly or a sprinkler stops: stop, shut off the water if safe, and correct the problem from the ground. Never delay evacuation.